Sunday 21 December 2014

Christmas Tree Stand

I decided to get Ali a Christmas tree for her present this year.  Since I didn't feel like buying a stand I cranked out a design in SolidWorks.  This also let me trial an idea I had for easily manufacturing my CAD designs - more on that later.
After a couple concepts I arrived at a design:


The central ring is broken down into into 120 degree segments, this allowed me to use the smaller pieces of scrap wood in the workshop and mitigate weak spots around the ring due to grain direction.  The central hole was specified to accommodate an old stainless steel camping bowl that was given to me by a friend - Fiona -for helping her sell her worldly goods prior to leaving Nova Scotia to teach English in south east Asia.

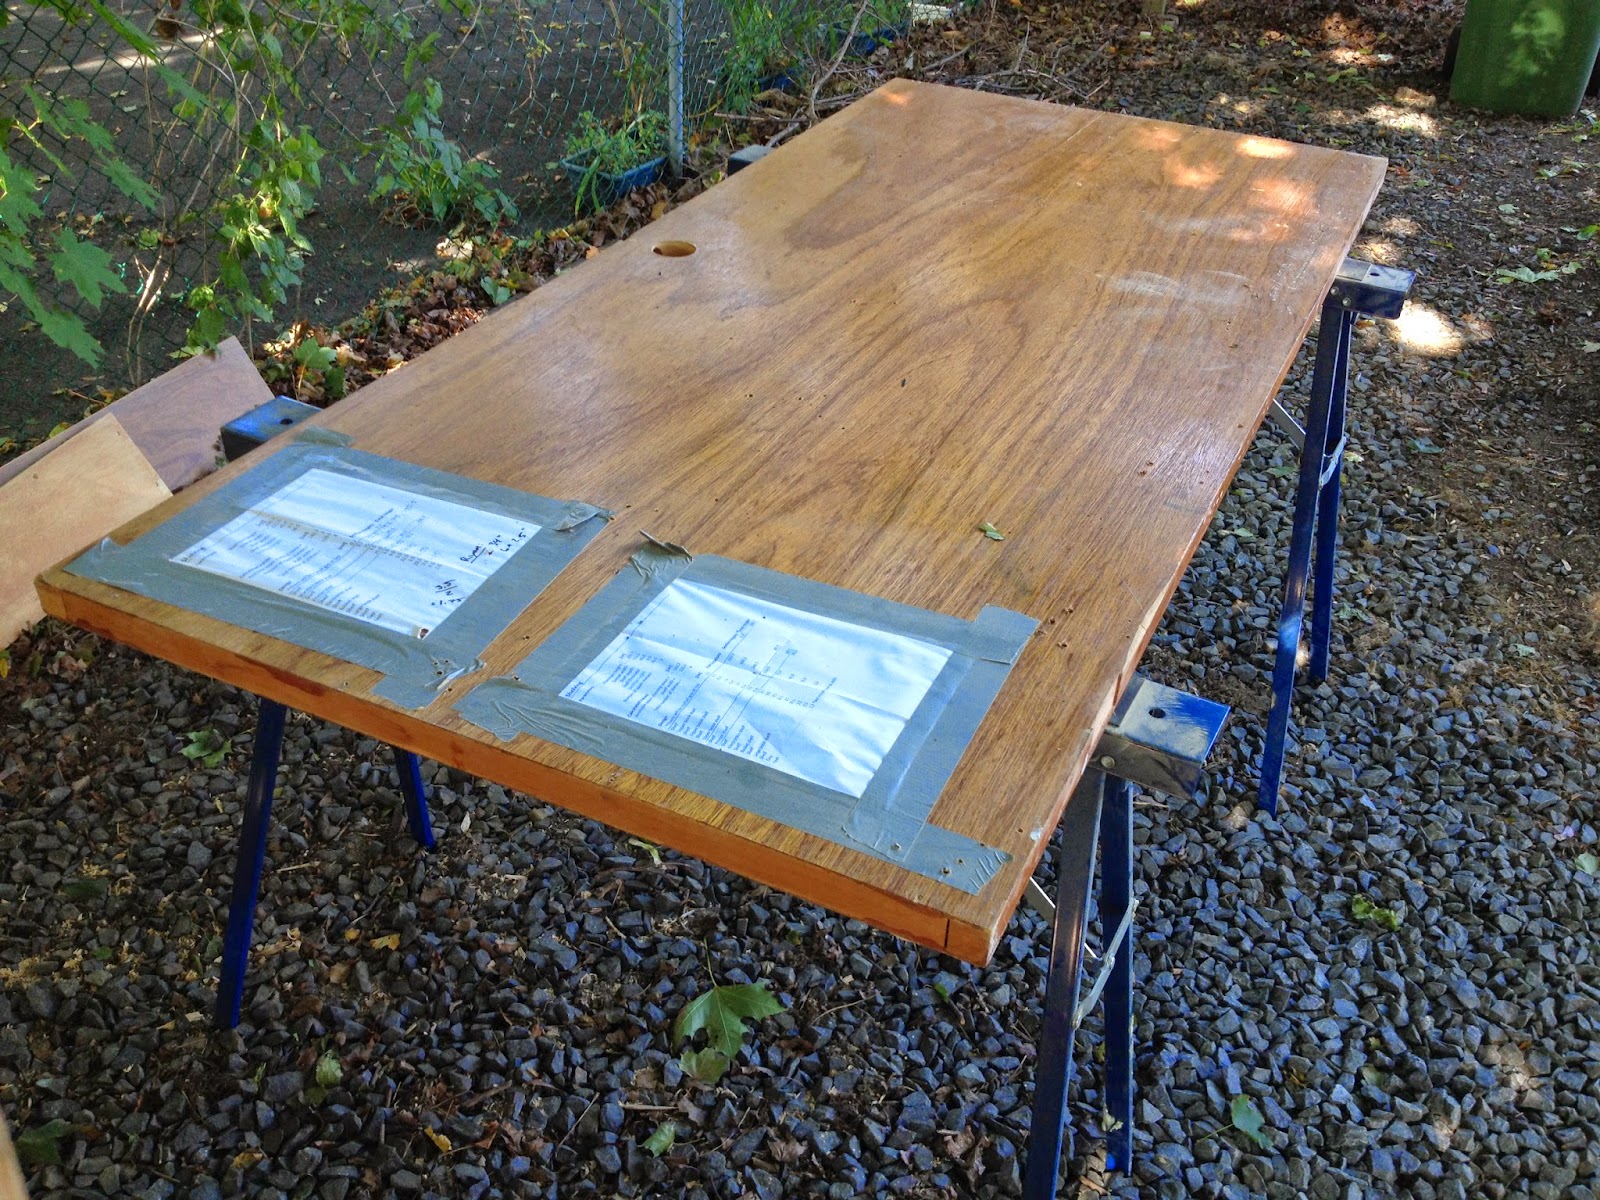
Now for the innovation: having lost many an hour drawing cut-lines into a block of wood like some sacred tablet, only to have something be just a little off and have to do the whole thing over again; I wanted to find a way to quickly perform design iterations on wood pieces, so I decided to make stickers!  I found a spray adhesive that was capable of forming temporary bonds and printed 1:1 scale CAD draft files that I cut out and stuck to my work-piece, in this case some scrap cedar.


 I had cut out the paper profiles exactly along the lines - a detailed effort that was not required, the rough outline would have sufficed and been more in keeping with my 'expedient' concept, next time.  Regardless, it worked great!  The stickers remained in place during the cutting but peeled off easily afterwards.


The stepped design of the legs allowed me to have flat surfaces to drill the screw holes and mechanical interlocking of the legs and ring.  I used dowel joints (turns out dowel centers are handy things) for the ring segments and got lucky with the jaw width of my clamps:


Oh, and notice my drop-cloth, it is an old shower curtain - best drop-cloths I have tried yet, and cheap if you reuse the old grubby one you replaced in the bathroom.


Then it was time to install the tree, which was hand picked by moi at 1:00 am via headlamp in my parents back yard - sorry dad if you were fond of that tree.  The adjustable positioning screws - which were salvaged off old closet doors my apartment was trowing out - did their job, as did the levered design of the legs - the down-force of the tree causes them to pinch inwards at the top; but alas it would not stay up, the metal bowl lacked the usual central spike to fix the stump.  After considering putting a hole for a screw through the bowl (and attempting to, to the demise of a drill bit), I came up with a non-destructive and likely less-leaky solution: a cut and bent tomato can lid.


No, I don't eat rusty tomatoes, these pictures were taken after the tree was taken down.  The fix made the tree rock solid in the stand and the bowl avoided a new existence as a very sad colander.

Finishing touches: to make use of the overhang of the Christmas light strand we wrapped it around the base and used a piece of white fabric hemmed off the bedroom curtains as snow effect, then time for ornaments and presents!

Saturday 27 September 2014

Book Shelf

To finish the living room of the new apartment I decided to try an idea of mine that had been rattling about my head for a while: using hollow core doors to build Ikea-styled furniture.

After some patient searching I sourced some materials through Kijiji, though I got more than I bargained for.  How many doors can you fit in a VW Golf?  Well it depends on how your counting: 17 if you consider the bi-fold closet door pairs as one, 22 if you don't.


Before I even had a chance to get started we had found other uses for the doors.  Here we expanded Ryan's desk space and built a riser for his monitors.  The hole for the door handle provided a convenient cable pass through - a feature I employed in my own desk.


Another of the doors turned into my work bench, taped to it are the shelf spacing's: the bottom shelf needed to accommodate textbooks, the second some old wicker baskets I was using for storage, the third the stereo receiver and Xbox, and the fourth the printer.  The remaining space was divided into equal parts for general use, I got lucky and it turns out my 'equal parts' are just the right height to accommodate most novels; naturally all of this was done in Excel - <3 Excel.


Begin construction.
I used the bi-fold doors as they only required re-sizing in one dimension.


I ripped some pine to 1 1/8" using the band saw to use for shims in the cut ends of the doors and glued them in place.


I made the holes in the sides large enough to allow some clearance around the screws I was going to use since I didn't use a jig for drilling my hole in the shelves.  In the end it went together without too much trouble.  I installed threaded glides (feet) in the four corners so I could ensure the finished product sits level.


Then knocked it apart again and transported it home since the weather was to finally turn to rain, and rain it did.  It was fortunate that I didn't choose to store it in my old landlords basement as the storm turned it into a 4" swimming pool that night.  Some of my tools got wet but nothing that couldn't just be dried out, though the digital torque gauge needed to be disassembled and actively dried with a hairdryer.

In position, awaiting a decision on stain.


I went with one step espresso stain, it took a whole can for the first coat and the second turned out a little darker than I had hoped, but it still looks good.  All my spacing measurements worked out, the wicker baskets are a little sung but functional, and turns out we had a record player that needed a home - records too.  The bottom shelf needed to be shimmed with an old log book from second year engineering due to the weight of the textbooks.  I will install a couple more  threaded glides, - front and back along the mid-line of the shelf - when it comes down in the next move.


Thursday 25 September 2014

Shipwreck Bed Frame

My old bed platform finally died just before my last move, leaving my mattress unceremoniously on the floor.  While knocking down a tree for one of my parent's neighbours and friends I saw a couple old wharves washed up on their beach which gave me inspiration.


So soon enough I was hopping about the rocks with a pry bar and a 10 lb sledge knocking apart boards while staying (mostly) out of the water.


Then back to the workshop.


After a couple design concepts I settled on 6" x 3/8" lag bolts for securing the rails and large door hinges for hanging the centre stringer under the slats - the hinges were salvaged from an relative's old door that was replaced during renovations.  The slats were the only bit of non-wharf wood in the project, they were ripped from scraps around the house and workshop.


To cut the recesses for the head and foot rails in the 4x4 posts I used the oscillating tool attachment for my Black & Decker Matrix - awesome tool, highly recommended, especially for nomadic builders such as myself.
In the background are the unfinished pieces of my new bookcase.


I had to use my automotive impact gun to install the bolts, wound up shattering one through a knot.
I didn't have much for scraps left over when everything was done, at least done as I could be, I was still missing a board for the bottom of the headboard's secret compartment (ssssh), but the sea shall provide.

I have to hand it to the VW engineers, they really pulled off some interior space magic; just when you think a thing cannot possibly fit, it does.  Probably should have taken this into consideration for the design in the first place...


Installation (using impact driver head for the B&D Matrix).


I used a couple of old Ikea lamps that I had on my bedside table for built in lighting, I fed the cords through the sides just under the headboard top decking and mounted the switches behind the corner posts.


Finished product.
While I may not have taken trunk dimensions into consideration for the headboard design, I did design it to be level with the window sill of the bedroom - make sure you account for the thickness of the felt pads on the legs!  Sure this window will probably never be a feature again, but whatever, I needed a design constraint, so that was it.  I also gave generous clearance for the baseboard radiator via cutouts in the bottom rear of the headboard; I find it unfortunate when trim or other obstructions prevent furniture from being flush with the wall.

Thursday 17 July 2014

Monitor Stand, Mk02

I decided to upgrade my desktop monitor, partly to have something that lent itself more to watching movies on; and part to just have a sweet new monitor.
The new monitor would also require a new monitor stand.  I had built one for my previous monitor but since my cousin bought my old monitor and loved the stand so much, well it went too.
Requirement:  When seated at a typical desk (29-30"), the height of the center of the screen should be eye-level.
Next came the time consuming part: finding the right driftwood stump, but its also a great excuse to get out in my kayak and island hop in St Margret's Bay.
Eventually I found a suitable candidate, and accompanying board, on Big Thrum and toted them home on the stern of my boat.  Then all there was to do was let out the monitor stand contained in the old stump, via hours of sculpting with the belt-sander.

The roughed-out piece.


The usual project tool-explosion; and nearly finished piece.  I notched the back of the stump with an appropriate angle to allow the mounting board to be bolted into position at the correct angle - to ensure that the centre of gravity of the unit was located within the base of support.  Once the board was fixed in place with a lag bolt, it was time for the belt-sander again to blend the two pieces of wood together.


Mounting bracket installed, feet leveled, sitting happily on my desk.


I made a cut-out large enough to pass a VGA cable through at the level of the plugs in the back of the monitor when it is mounted.  This prevents them from having to bend and allows them to be hidden in behind.


Monitor installed.


Monday 21 October 2013

Desk, Mk02

Rolling into third year of mechanical engineering (2013) I needed a new desk.  I had refurbished one before, it was a rescue from the Dunn building, a 1950's vintage with some clever elements to it so I wanted another like it.  I found one on Kijiji that was free to anyone who would drag it off - my mother's poor little Suzuki SX4 just barely contained it.
Once home, it was time for a tear down and sand of all the panels, which required yet another invasion of my parent's garage.


The parts on right are the pair of pull-out work surfaces, one of the features I really enjoyed.  The oak veneer on the desk top didn't sand as evenly as I had hoped so I had to go to a black stain to cover up those 'little sins'.


A previous owner had cut off the legs, likely to have it fit through a door frame, but had simply reattached them using a single metal bracket on each leg.  I upgraded the assembly using hanger bolts and thread inserts.  I also added threaded glides to each of the legs.


Stain and primer.


Finished product, including my original driftwood monitor stand.  I lucked out for hardware as my mom had unused handles she had picked it up at a Rona close-out sale that she contributed to the cause.


Expandable work surface in action.


Sunday 22 September 2013

Hexagon Plant Pots

After casually searching for months for new plant pots I finally accepted the fact that I just wasn't going to find any I liked and set out to build my own.  I had recently watched a documentary on honey bees and was inspired by the little critters.
To simplify the fabrication process I drew up the plans in SolidWorks and used 1:1 draft files as templates and references.


Then I had to figure out what I wanted to do for arrangements and side heights.  Seven seems to be a good number, it allowed good versatility in arrangement and would accommodate all my plats with pots to spare.


Found a lot of interesting resources on geometry and drawing hexagons.


The sides are screwed into the base, the vertical seams were fixed with Gorilla glue; I used my kayak straps as circumferential clamps for the process, though ratchet straps may have worked better.  I used a belt sander to even-out the top edges once the glue had set.


Wood filler did the rest.


I used roofing cement to seal the seams, though I made the mistake of spraying the insides with a high-build undercoating afterwards.  The undercoating attacked the cement and compromised the seals - note to self: don't mix bitumen products and aerosol solvents.
Next was paint: the grey was simply some leftover interior paint.  In order to speed up the drying process in an otherwise cool and damp basement, I recruited the dehumidifier.


Next I used some dark green acrylic craft paint in a two step process for the finish:  First I watered some down and used a cloth to apply it over the grey, then I used the same cloth but bunched up to dab on the marble pattern using undiluted paint; the canvas in the background was my test subject.


Finally I lined the bottoms of the pots with plastic bags and taped them in place - just to be sure there wasn't going to be any issues with leaks.  For fill I used 3cm or so of pea-gravel in the bottom, followed by landscape fabric, then potting soil, and plants - clearly.